Beginner’s Guide: Understanding the Basics of Drywall Repair
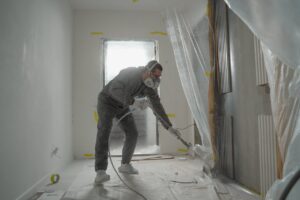
Ever wondered about the ins and outs of DIY drywall repair for walls and ceilings? From beginners to products, understanding the basics of paint composition and the benefits it offers is crucial. Drywall, comprising gypsum plaster encased in paper layers, serves as a sturdy wall and ceiling material. Its fire-resistant nature, sound insulation properties, and coat make it an ideal choice for homes and buildings. Moreover, with various types like standard, moisture-resistant, and fire-resistant options available, each tailored for specific environments, delving into drywall repair becomes essential. So let’s unravel the fundamentals of drywall repair and explore how drywall compound (mud) plays a pivotal role in maintaining pristine walls. Preparing for Repair Safety Measures When dealing with drywall repairs, it’s crucial to prioritize safety steps. Always wear protective gear like gloves and goggles to shield your hands and eyes from potential harm. Handle sharp tools, drywall compound, and step with caution to prevent any injuries during the repair process. Ensuring proper ventilation in the work area is also an essential step as it helps minimize the inhalation of dust particles. To illustrate, imagine you’re about to start repairing a hole in your drywall step. Before diving into the repair work, equip yourself with sturdy gloves, protective eyewear, and step. As you handle tools such as utility knives or sandpaper, maintain a steady focus on using them safely to avoid any accidental cuts or scrapes. Moreover, ensure that there’s adequate airflow in the room by opening windows or using fans while working on the repair. Floor Protection Protecting your floor is another vital aspect when embarking on drywall repairs. To safeguard it from debris and damage during the repair process, lay down drop cloths or plastic sheets on the floor before commencing any work. You may also consider utilizing self-adhesive floor protection products for added convenience in preventing scratches or stains caused by repair materials. For instance, if you’re patching up a section of damaged drywall near the floor, spread out a durable drop cloth beneath your workspace to catch any falling debris or spills that might occur during the repair task. After completing each phase of repairing, take some time to tidy up any accumulated dust or debris on the protected floor surface. Tools and Materials Essential Tools Having the right tools is crucial for a successful project. Some essential tools include a utility knife for cutting drywall, a taping knife for applying joint compound, a sanding block for smoothing surfaces, and a screwdriver for removing or inserting screws. These tools are fundamental in addressing common issues such as holes, cracks, or dents in drywall. Other useful tools like a drywall saw, hammer, drill/driver, and measuring tape can make the repair process more efficient. It’s important to have these tools on hand before starting your project because they will help you complete the repairs effectively. For instance, using the correct taping knife ensures that joint compound is applied smoothly and evenly over seams and joints. Types of Drywall Tape Understanding the different types of drywall tape is essential when undertaking repairs. One commonly used option is paper tape, known for its strength and flexibility when repairing drywall seams. Another alternative is self-adhesive mesh tape which simplifies the taping process by eliminating the need for an initial layer of mud underneath it. Moreover, fiberglass mesh tape provides reinforcement at corners to prevent cracking—a common issue in high-traffic areas like hallways or stairwells. Each type of tape serves specific purposes based on the nature of damage being repaired—whether it’s seams or corners—and understanding their applications will ensure that your repair work holds up over time. Repairing Small Holes Patching Process To begin repairing small holes in drywall, start by removing any loose or damaged drywall around the area that needs repair. This ensures a clean surface for the patch to adhere to. Then, cut a patch of new drywall slightly larger than the damaged area. Use this patch to cover the hole and secure it in place using screws or nails, making sure it is flush with the existing wall. For example: If you’re fixing a nail hole from hanging a picture frame, you may only need a small piece of drywall as your patch. For larger holes caused by accidents or furniture bumps, you might need to create a square or rectangular patch. Sanding to Perfection After applying joint compound over the patched area, it’s crucial to sand it down using fine-grit sandpaper. This step is essential for achieving a smooth and seamless finish on your repaired wall. Be careful not to oversand as this can damage the surrounding drywall and result in an uneven surface. Moreover: Over sanding can lead to an uneven texture that stands out once painted over. Wipe away dust with a damp cloth before proceeding further; this helps ensure proper adhesion when priming and painting. Repairing Large Holes Installing Support For larger repairs, it’s crucial to install support behind the damaged area. This can be achieved by using wooden backing or metal patches. By doing so, you provide stability and prevent future cracking or sagging. It’s important to follow the manufacturer’s instructions for proper installation techniques to ensure the effectiveness of the support. When dealing with significant damage, such as large holes, installing support is essential for maintaining the structural integrity of the drywall. Without this additional reinforcement, there is a risk of continued deterioration and potential safety hazards in the long run. Cutting Drywall Patch To effectively repair large holes, start by measuring and marking the dimensions needed for the patch. Once marked, carefully use a utility knife or drywall saw to cut along these lines. The precision of your cutting will determine how well your patch fits into place without any gaps. Advanced Repair Techniques Applying Multiple Coats When repairing drywall, it’s essential to apply multiple thin coats of joint compound over the patched area. Each coat should dry completely before applying the next one. By doing this, you ensure a stronger and