Paintmaster logo

Top 10 Tools Every Homeowner Needs For Effective Home Painting Preparation

Painting your home can be a rewarding and cost-effective way to give it a fresh look and boost its curb appeal. However, the key to a successful paint job lies in thorough preparation. Investing in the right tools can make the process smoother, ensuring a professional finish that stands the test of time. In this comprehensive guide, we’ll explore the top 10 tools every homeowner needs for effective home painting preparation.

1. Painters Tape: Precision In Every Stroke

One of the fundamental tools for any painting project is high-quality painter’s tape. It provides clean and sharp lines, protecting areas you don’t want to be painted. Look for tapes designed for specific surfaces, such as delicate surfaces like freshly painted walls or textured surfaces like stucco. Properly applied painter’s tape ensures a polished finish and saves time on touch-ups.

2. Drop Cloths: Shielding Floors And Furniture

Accidental spills and splatters are inevitable during a painting project. Protect your floors and furniture with durable drop cloths. Canvas drop cloths are absorbent and provide a non-slip surface, while plastic drop cloths are excellent for quick and easy cleanup. Investing in these protective barriers not only saves you from potential damage but also makes the cleanup process much more manageable.

3. Sandpaper And Sanding Blocks: The Foundation Of A Smooth Surface

Achieving a flawless paint finish starts with a smooth surface. Sandpaper and sanding blocks help remove imperfections, old paint, and uneven surfaces. Invest in various grits of sandpaper, ranging from coarse to fine, to address different surfaces and levels of roughness. Smooth surfaces not only enhance the aesthetic appeal but also allow paint to adhere better for lasting results.

4. Patching And Filling Tools: Repairing Imperfections

Before applying paint, it’s crucial to address any cracks, holes, or imperfections in the walls. Patching and filling tools, such as spackle and putty knives, come in handy for repairing these issues. Ensure you choose the right filler for the specific surface, whether it’s wood, drywall, or plaster. Properly patched surfaces contribute to a uniform and professional-looking paint job.

5. Caulking Gun: Sealing Gaps And Cracks

A caulking gun is essential for sealing gaps and cracks around windows, doors, and trim. Proper caulking prevents drafts, improves energy efficiency, and creates a seamless look. Choose a high-quality caulk that is paintable and suitable for both interior and exterior applications. Regular maintenance and sealing ensure the longevity of your paint job and protect your home from the elements.

6. Paint Scrapers: Removing Old Paint Gracefully

Before applying a fresh coat of paint, it’s essential to remove any loose or peeling paint. Paint scrapers come in various shapes and sizes to tackle different surfaces and angles. Opt for scrapers with ergonomic handles for comfortable use over extended periods. Removing old paint not only enhances the adhesion of the new paint but also contributes to a smoother and more durable finish.

7. Wire Brushes: Preparing Surfaces For Paint

Wire brushes are versatile tools that play a crucial role in preparing surfaces for paint. They help remove rust, loose paint, and debris from various materials, including metal and wood. Wire brushes come in different shapes and sizes, allowing you to reach tight spaces and corners. Properly preparing surfaces with wire brushes ensures that the paint adheres well and provides long-lasting protection.

8. Power Washer: Cleaning Exterior Surfaces

For exterior painting projects, a power washer is a game-changer. It efficiently cleans dirt, mold, and mildew from surfaces like siding, decks, and fences. The high-pressure water stream not only saves time compared to manual cleaning but also ensures a thorough and even cleaning. A clean surface is essential for optimal paint adhesion and a professional finish.

9. Painter’s Tool: Multipurpose Solution For Edges And Corners

A painter’s tool, also known as a 5-in-1 tool, is a multipurpose gadget that simplifies various painting tasks. It typically includes a scraper, putty knife, paint can opener, nail puller, and a convex blade for creating clean paint lines. Having this all-in-one tool at your disposal reduces the need to switch between different instruments, streamlining the painting process and enhancing efficiency.

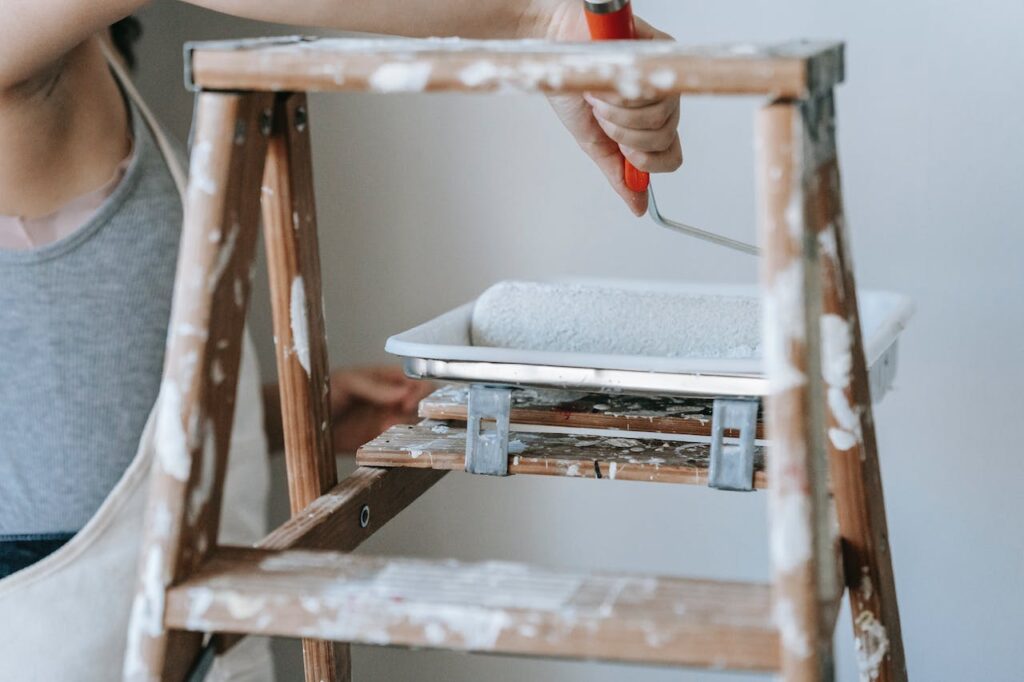
10. Paint Trays And Roller Grids: Ensuring Smooth Application

Efficiently applying paint requires the right tools for the job. Paint trays and roller grids facilitate the even distribution of paint onto the roller, ensuring a consistent application on walls and ceilings. Look for trays with disposable liners for easy cleanup and roller grids that fit snugly into the tray to prevent spills. These tools contribute to a smooth and professional-looking finish, whether you’re painting large surfaces or intricate details.

Conclusion:

A successful home painting project begins with thorough preparation, and the right tools are instrumental in achieving optimal results. From precision with painter’s tape to efficient cleaning with a power washer, each tool plays a crucial role in the overall success of the project. Investing in high-quality tools not only ensures a professional finish but also makes the entire painting process more enjoyable and rewarding. Armed with the top 10 tools mentioned in this guide, homeowners can confidently take on their painting projects, transforming their living spaces with a fresh and vibrant new look.

Ready For A Home Makeover With Stunning Paintwork?

Welcome to PaintMasters, Concord, California’s leading expert in home painting preparation and execution. Since 1994, we’ve been transforming living spaces, from quaint homes to bustling offices and everything in between. Our approach to painting is more than just applying a new color; it’s about preparing your space to ensure a flawless finish. With state-of-the-art tools like our 15,000 CFM spray booth, we guarantee a result that’s not just seen but felt.

At PaintMasters, we offer more than just a fresh coat of paint. Our comprehensive services include meticulous preparation steps such as sanding, priming, and drywall repair, ensuring your walls are perfectly prepped before any color is applied. Our experienced team combines their expertise in various aspects of home preparation to rejuvenate and transform your space, making it look and feel reborn. We’re committed to excellence on the first try, providing you with a smooth and enjoyable home makeover experience.

Are you ready to reinvent your home with impeccable paintwork? At PaintMasters, we’re not just about painting; we’re about creating a lasting impression of quality and beauty. Contact us today to start your journey towards a beautifully transformed home. Let’s work together to turn your vision into a reality, crafting spaces that resonate with style and elegance. Experience the PaintMasters difference – where every stroke is a step towards perfection. Get in touch now to begin your home’s transformation!

More To Explore

Exterior House Painting

Exterior House Painting: What To Expect During The Process

Introduction: Understanding The Exterior House Painting Process When it comes to painting the exterior of your home, it’s important to understand the process to know what to expect. From choosing the right paint to preparing the surface and applying the paint, there are several steps involved in exterior house painting. In this article, we will explore the different stages of the process, so you can be prepared and informed. Step 1: Setting Up The Work Area Setting up the work area is an essential part of the exterior house painting process. It involves clearing the area around the house, removing any furniture, and covering nearby plants and landscaping to protect them from paint splatters. The painting contractor or DIY painter will also need to set up ladders, scaffolding, and other equipment needed to access higher areas of the home’s exterior. This step is critical for ensuring a safe and efficient painting process. Step 2: Preparing The Surface The second step in the exterior house painting process is preparing the surface. This includes cleaning the surface to remove any dirt, debris, or mildew, repairing any damage or cracks, and sanding the surface to ensure the paint adheres properly. It’s also essential to prime the surface before painting to ensure the paint lasts longer and adheres better. Proper preparation is critical to achieving a professional and long-lasting paint job. Step 3: Applying The Primer After the surface has been prepped, the next step is to apply the primer. The primer serves as a base layer for the paint and provides several benefits such as better adhesion, increased durability, and improved coverage. It also helps to even out the surface, filling in any pores or imperfections, and creating a smooth surface for the paint to adhere to.  When selecting a primer, it’s essential to choose one that’s compatible with the type of paint being used and the surface it’s being applied to. Some surfaces may require a specific type of primer, such as metal or masonry surfaces, which have different properties and require different types of primers.  The primer should be applied evenly, using a brush or roller, in thin coats to avoid drips and to ensure proper adhesion. It’s important to allow the primer to dry completely before applying the paint, which can take anywhere from a few hours to overnight depending on the type of primer and the environmental conditions. Step 4: Applying The Paint Once the primer has dried completely, it’s time to apply the paint. It’s recommended to use two coats of paint for better coverage and durability. Apply the paint in a consistent and even manner using a brush, roller, or sprayer. Make sure to follow the recommended drying time between coats. When painting the surface, work in sections and paint from top to bottom. Use long strokes in the same direction to avoid visible brush or roller marks. It’s important to maintain a wet edge and avoid letting the paint dry before blending with the next section. Depending on the paint type and weather conditions, it may take several days for the paint to fully dry and cure. During this time, avoid touching or rubbing the painted surface to prevent smudging or damaging the paint. Step 5: Touch-Ups And Final Inspection After the paint has dried, the painters will inspect the job for any missed spots or imperfections. Any necessary touch-ups will be made, and a final inspection will take place to ensure that the paint job meets the homeowner’s expectations. The crew will remove any masking tape or coverings, clean up the work area, and restore any outdoor fixtures or furniture to their original locations. The homeowners will be invited to inspect the work and provide feedback, and the crew will make any final adjustments to ensure complete satisfaction. The project is considered complete once the homeowner approves the finished product. Conclusion: Achieving A Successful Exterior House Painting Achieving a successful exterior house painting requires a thorough understanding of the painting process. By following the steps involved, homeowners can ensure a professional and long-lasting result. Setting up the work area, preparing the surface, applying the primer, applying the paint, and performing touch-ups and a final inspection are all critical steps in achieving a high-quality paint job. Each step plays a significant role in the outcome of the project, so it’s crucial to take the time to complete each step correctly. By understanding and following the exterior house painting process, homeowners can ensure a successful outcome and a beautiful home exterior. Our Experts’ Take According to Paul F. Aubin, a practicing architect and author, exterior house painting can significantly enhance a home’s appearance and value, but the process can be overwhelming for some homeowners. He suggests hiring a professional painter who can ensure proper preparation, use high-quality materials, and apply the paint with the correct technique for a long-lasting and beautiful result.  Similarly, Bob Vila, a renowned home improvement expert, recommends hiring a professional painter for complex painting jobs or large houses, as they have the necessary tools and experience to handle the project efficiently. However, he also acknowledges that some homeowners may choose to tackle exterior painting on their own, in which case he advises thorough preparation and proper safety precautions.  Overall, experts suggest that homeowners carefully evaluate their skills, time, and budget before deciding whether to DIY or hire a professional for exterior house painting. They also stress the importance of proper preparation and quality materials to achieve a successful and long-lasting paint job. https://www.youtube.com/watch?v=7Eu5YcqtEWIhttps://www.youtube.com/watch?v=ame8ukzaO4A Do You Need A Professional House Painting Team You Can Trust? Refresh your home and space with the experts at PaintMasters! Since 1994, PaintMasters has been the top residential and commercial painting company in Concord, California. We proudly serve Lamorinda, Tri-Valley, Contra Costa, and the surrounding areas. With our cutting-edge technology, unparalleled expertise, and state-of-the-art 15,000 CFM spray booth, you can be sure that your cabinets will receive a top-notch finish. Our team of experienced professionals is expert in

The Impact Of Wood Surface Painting On Property Value

Wood surface painting has a significant impact on property value. By enhancing the overall appearance, painting wood surfaces can greatly increase the desirability and marketability of a property. The condition of these surfaces is crucial in determining the value of a property, making it essential to pay attention to their treatment and maintenance. This article presents research on the effects of wood surface painting on property value. Through meticulous measurement and testing, various samples were examined under different environmental conditions. The results highlight the importance of proper painting techniques, quality materials, and resistance to external elements in preserving the aesthetic appeal and longevity of wood surfaces. Whether you are interested in improving your own home or considering selling a house, understanding the impact of wood surface painting is vital. Stay tuned as we delve deeper into this topic, providing valuable insights for homeowners and real estate professionals alike. Exterior Painting And Property Value Marketability Boost A freshly painted wood surface can have a significant impact on the marketability of a property. When potential buyers or tenants see a property with well-maintained painted wood surfaces, it becomes more appealing to them. The fresh paint gives the impression that the property has been cared for and is in good condition. As a result, properties with freshly painted wood surfaces tend to attract more interest and can sell or rent faster than those without. Curb Appeal Enhancement Painting wood surfaces can greatly enhance the curb appeal of a property. When the exterior of a house or building is painted, it instantly stands out in the neighborhood. A fresh coat of paint on wood exteriors can make the property look clean, well-maintained, and visually appealing. This enhancement in curb appeal creates a positive first impression for visitors and potential buyers. It makes them more likely to be interested in exploring further and considering the property as an option. Appraisal Value Increment Well-painted wood surfaces can contribute to an increase in the appraised value of a property. Appraisers take into account various factors when assessing the value of a property, including its overall condition and appearance. By painting wood surfaces, you are improving their aesthetic appeal, which positively influences how appraisers perceive the property’s value. With well-maintained and visually pleasing painted wood exteriors, your property may receive higher appraisal values compared to similar properties without this improvement. Return On Investment Investing in painting wood surfaces can yield a high return on investment for property owners. The cost of exterior painting is relatively low compared to other home improvement projects but has the potential to significantly increase the value of your property. By enhancing its appearance through painting, you are making it more attractive to potential buyers or tenants who are willing to pay more for a visually appealing home or building. This means that when you decide to sell or rent your property, you can expect to recoup your investment and potentially earn additional profit. Protective Benefits Of Wood Surface Painting Lifespan Extension Painting wood surfaces has several protective benefits that can greatly impact the lifespan of the wood. When wood surfaces are left untreated, they are susceptible to weathering, rot, and decay over time. However, by applying a coat of paint, these surfaces become more resistant to these damaging elements. One of the primary advantages of painting wood surfaces is that it helps protect against moisture damage. Moisture can seep into untreated wood, causing it to warp or swell. This can lead to structural issues and make the wood more prone to rotting. By painting the surface, a protective barrier is created that prevents moisture from penetrating into the wood. In addition to moisture protection, painted wood surfaces are also less likely to be damaged by insects. Certain types of insects, such as termites and carpenter ants, are attracted to untreated wood and can cause significant damage if left unchecked. However, when a wood surface is properly painted, it becomes less appealing and more difficult for insects to penetrate. Furthermore, UV rays from the sun can also take a toll on exposed wood surfaces over time. Continuous exposure to sunlight can cause fading and discoloration in untreated wood. By applying paint with UV-resistant properties, these harmful rays are blocked from reaching the surface of the wood, preserving its natural color and appearance. Regular maintenance is crucial in ensuring that painted wood surfaces continue to provide long-lasting protection. This includes periodically inspecting for any signs of wear or damage and promptly addressing them through touch-ups or reapplication of paint as needed. Wood Preservatives Effects Before painting a wooden surface, it is often recommended to use preservatives as an additional layer of protection against decay and pests. Wood preservatives are chemicals that penetrate deep into the fibers of the wood and provide long-lasting resistance against rotting and insect damage. By combining preservatives with paint on a wooden surface, a powerful defense system is created. The preservatives penetrate into the wood, strengthening its natural resistance to decay and pests. This helps to prolong the lifespan of the wood and reduce the need for frequent repairs or replacements. Preservatives can be especially beneficial in areas where wood is exposed to high levels of moisture or humidity, such as near bodies of water or in regions with heavy rainfall. These conditions create an ideal environment for rot-causing fungi and insects to thrive. By using preservatives, homeowners can effectively protect their wooden surfaces from these potential threats. It is important to note that when using preservatives, it is essential to follow the manufacturer’s instructions carefully. Some preservatives may require multiple coats or specific application techniques to ensure optimal effectiveness. Perceived Value Increase Fresh Appearance Impact Painting wood surfaces has a significant impact on the perceived value of a property. When wood surfaces are painted, they are given a fresh, vibrant, and updated look. A new coat of paint can transform worn-out or outdated wood surfaces into visually appealing features. For example, painting a weathered wooden fence can instantly make